Identification
Mushroom Spore Print Colors and How to Record Them
Use a controlled spore deposit to distinguish broad color groups while recognizing that print color alone never identifies a species.
By MushroomScope Editorial Team · · Updated
Safety first
Use as a field-record guide
Document the whole mushroom, habitat, substrate, and region before comparing names or photographs.
Open the identification safety hub →Decision limit
Do not use this as an edibility verdict
Wild mushroom consumption decisions require qualified local, in-person confirmation of the complete specimen.
Read the safety disclaimer →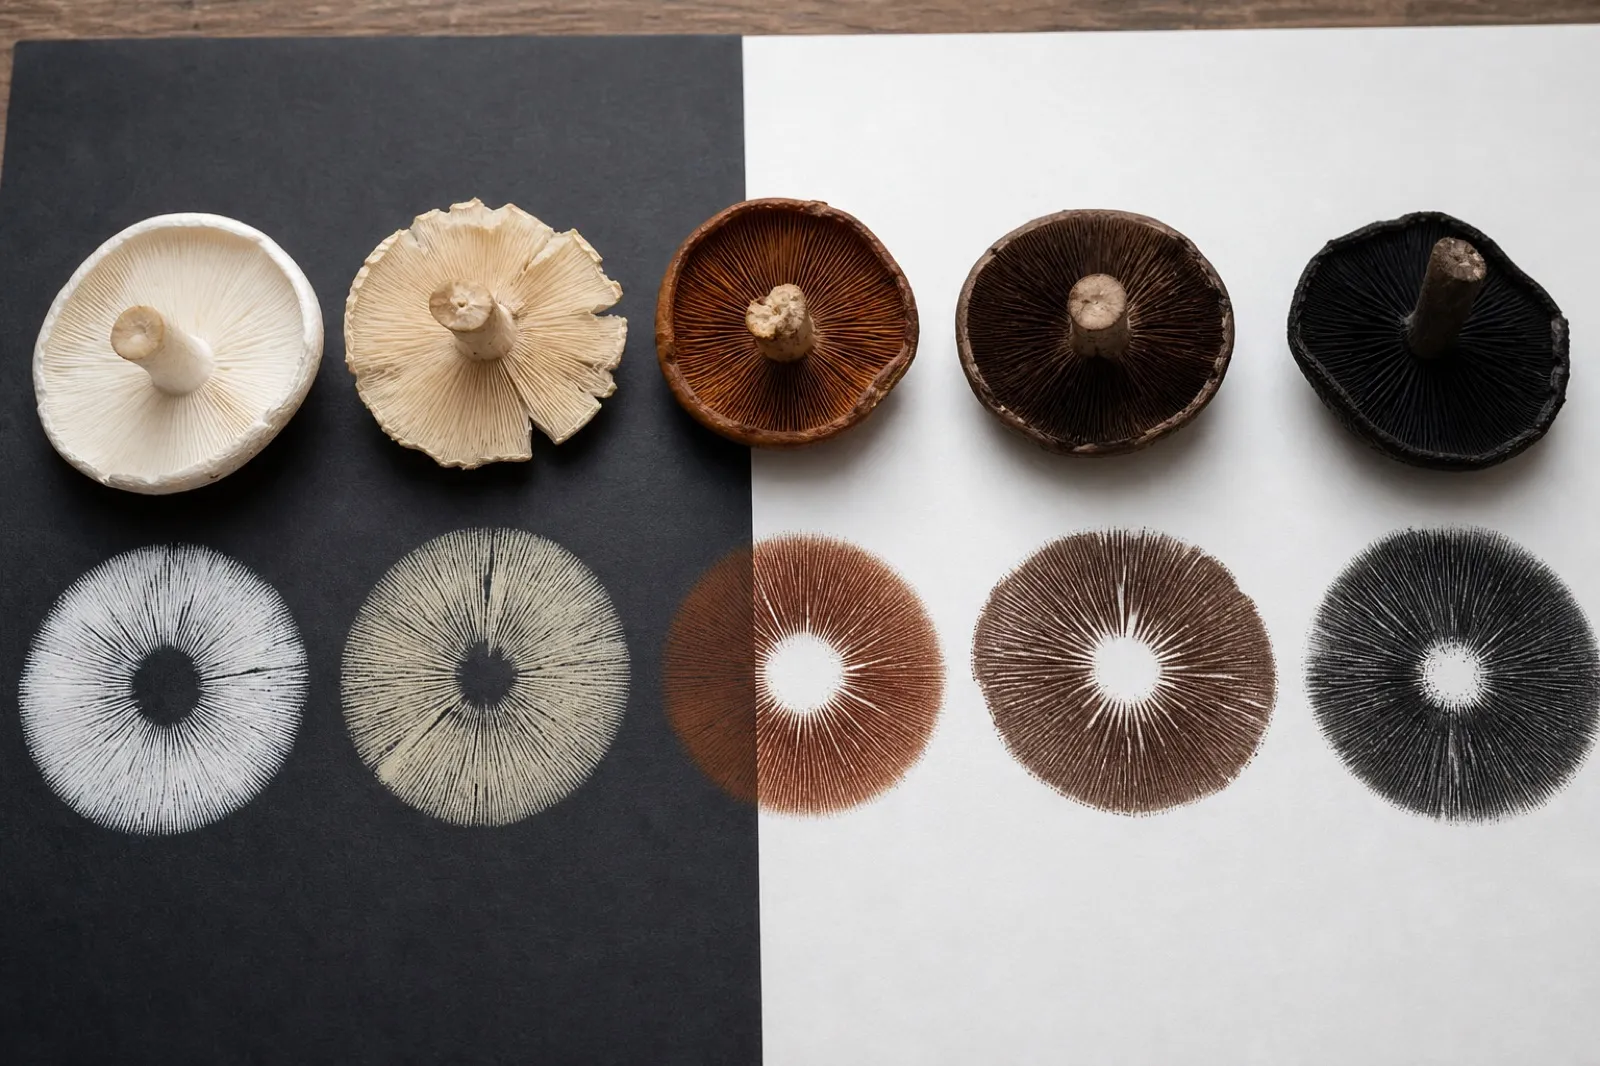
What a spore print can and cannot tell you
A spore print is a visible mass of microscopic spores released from a mushroom’s fertile surface. Its color can separate broad groups and provide a useful checkpoint in an identification key. It does not identify a species by itself, and it never establishes edibility.
Many unrelated mushrooms produce deposits described with the same broad word—white, brown, pink, or black. Conversely, field guides may distinguish subtle shades such as rusty brown, tobacco brown, purplish brown, salmon, cream, or lilac-gray. Those distinctions are useful only when the print is dense, clean, viewed under controlled light, and interpreted within the relevant species group.
Record the print as one character alongside cap, gills or pores, stem, complete base, flesh, habitat, substrate, season, geography, and developmental stage. If a proposed identification predicts a different spore color, treat that as a conflict rather than recoloring the observation to fit.
Choose appropriate material
Use a fresh, mature cap. A very young cap may not yet release spores, while an old, dry, waterlogged, frozen, or decaying specimen may release few or none. Mature gills often show their developed color, but gill color is not automatically the same as the massed spore deposit.
Photograph the complete specimen before removing the cap. Retain and label the stem and base because cutting the cap does not make those characters unimportant. If several similar mushrooms were collected, keep each collection separate so a print cannot be assigned to the wrong specimen.
Do not use mushrooms that may have contacted pesticides, animal waste, or an unknown indoor contaminant on a food surface. A spore-print setup belongs in a dedicated observation area, not beside meals, dishes, or cutting boards used for cooking.
Prepare a controlled surface
Use a clean, smooth, nonabsorbent surface divided into light and dark halves. The two backgrounds prevent a pale deposit from disappearing on white and a dark deposit from disappearing on black. Glass over black-and-white paper works well because the spores land on glass while the backgrounds remain consistent.
Aluminum foil is convenient and can be folded for storage, but its reflective surface can alter how pale gray, cream, or lilac tones appear. Plain white paper alone is poor for a suspected white print, and colored paper introduces a color cast. Absorbent paper may wick moisture and blur the pattern.
Label the surface with collection code, date, location, and specimen number before beginning. Do not rely on memory when several caps are printing at once.
Make the print step by step
- Photograph the intact cap, fertile surface, stem, and complete base.
- Remove the stem close enough to let the fertile surface sit level without crushing it. Preserve the stem with the voucher.
- Place the cap fertile-side down so part of the expected deposit crosses both light and dark backgrounds.
- Cover it with a clean bowl or container to reduce drafts and rapid drying. Do not seal it airtight.
- Check after several hours. Leave it longer, often overnight, if the cap remains fresh and the deposit is weak.
- Lift the cap vertically to avoid smearing the radial pattern.
- Photograph the untouched deposit in diffuse daylight or neutral high-quality light with a gray or white reference card if available.
- Record the massed color in words before spraying, folding, or moving the print.
A drop of water placed on top of a dry cap is sometimes suggested to encourage release, but excess moisture can produce condensation, bacterial growth, pigments, and misleading stains. Start with naturally fresh material rather than trying to revive a deteriorated specimen.
Recognize a genuine deposit
A successful gilled-mushroom print often mirrors the radiating arrangement of the gills. A pored mushroom may leave a fine pattern corresponding to pore placement. The deposit should consist of dry particulate material rather than a translucent wet ring.
Cap fragments, gill tissue, soil, insect debris, and colored moisture can imitate a print. Condensation tends to form droplets or broad stains rather than an organized fertile-surface pattern. If uncertain, inspect a small sample with appropriate magnification or repeat the print on clean material.
Record “no deposit obtained” when nothing appears. Never convert failure into “white spores.” A negative result may reflect specimen condition or technique, not spore color.
White, cream, and pale yellow deposits
White deposits are easiest to see over the dark half of the surface. Dense white spores may appear chalky, while a thin layer can look translucent or gray because the background shows through. Cream or pale yellow tones should be judged from a sufficiently heavy deposit, not from a few scattered particles.
Numerous genera produce pale prints, including both edible and toxic species. A white print cannot separate a cultivated-looking mushroom from a dangerous wild lookalike. Combine it with gill attachment, veil structures, stem base, habitat, and a regional key.
Photograph pale prints without direct flash. Specular glare can wash out cream and make texture look like color.
Pink, salmon, and flesh-colored deposits
Pink-spored groups vary from pale blush or salmon to dusty rose or pinkish brown. The substrate strongly affects perception, so compare the same deposit across light and dark backgrounds. Avoid describing the pink tone from gill color alone.
Some mature gills become pink before turning brown as spores develop, while other mushrooms retain pale gills despite a colored deposit. Print the cap instead of inferring the answer.
Pink does not mean edible. Toxic and non-edible mushrooms occur among pink-spored groups, and structural differences may be subtle. Treat the color as a route to the next key couplet, not a verdict.
Ochre, cinnamon, rusty, and other brown deposits
Brown is a large family of colors. A deposit may be yellow-brown, ochre, cinnamon, rusty orange-brown, tobacco brown, chocolate, or very dark brown. Field-guide vocabulary differs, so retain a neutral-light photograph and compare within the same guide rather than translating names too confidently.
Rusty or cinnamon deposits can be especially important in separating wood-growing lookalikes. For example, a pale-spored hypothesis conflicts with a clearly rusty deposit even if cap color and clustered growth seem similar. The oyster mushroom lookalikes guide shows why this conflict must stop a casual identification.
Do not use a weak orange-brown stain from cap tissue as evidence. Look for a dry, structured deposit.
Purple-brown, dark brown, and black deposits
Very dark prints should be viewed across both backgrounds. A purple-brown deposit can look black on white paper, while true black may lose subtle texture on the dark half. Tilt the surface under diffuse light without relying on glare.
Dark spore colors occur in multiple ecological and morphological groups. Some gills become mottled as spores mature unevenly; that pattern can support a hypothesis but does not replace a controlled print.
Describe what you actually see—“very dark brown with a purplish cast in daylight”—rather than selecting “black” because an app predicted it.
Why gill color and print color differ
Gills contain their own tissue pigments, and their appearance changes with age, bruising, moisture, and the accumulation of mature spores. Young gills may begin pale and darken as spores collect. In other species, the gill tissue stays a different color from the deposit.
A rusty dust on a stem or on caps below a cluster may be released spores and can be useful supporting evidence, but it may also be soil or debris. A controlled print provides a cleaner comparison.
Record both characters separately: gill color in young and mature specimens, then massed spore color from the print.
Lighting and photography controls
Judge color in indirect daylight or a neutral, high-color-rendering lamp. Warm household bulbs can turn white into cream and gray into brown; cool lighting can suppress yellow or introduce blue. Disable strong phone filters, portrait effects, automatic scene enhancement, and unusual white-balance modes.
Include the light and dark backgrounds and, if available, a neutral gray card in one frame. Avoid clipping the highlights. Save the original file because messaging apps and social platforms can compress or recolor images.
A photograph is documentation, not a universal color standard. Two monitors may display the same image differently, so retain the written observation made under known light.
Troubleshoot weak or missing prints
First check maturity and freshness. Try another healthy mature cap from the same well-documented collection. Level the fertile surface, reduce drafts, and prevent the covering container from touching the cap. Check that the specimen has not dried completely or begun to rot.
Some fungi release spores poorly under household conditions, and some fertile structures are not suited to the classic cap-on-paper method. Puffs, cups, crusts, and gelatinous fungi require different observation methods. Do not force every fungus into a gilled-mushroom procedure.
If repeated attempts fail, record the failure honestly and continue with other characters or qualified microscopic help. Missing data should lower confidence.
Preserve a print and its provenance
For a teaching record, photograph before preservation. A print on foil can be folded carefully without smearing. A print on glass may be covered or sampled. Artists sometimes use fixative, but sprays can darken or shift color, so the pre-fixative record is the identification evidence.
Label the print with a unique collection number linked to field photographs, substrate, date, location, measurements, and voucher. An unlabeled print quickly becomes scientifically meaningless.
Avoid mailing unknown biological material across borders or into jurisdictions with restrictions. Consult applicable rules and the receiving expert first.
When microscopy becomes necessary
Mass color describes thousands or millions of spores together. Under a microscope, individual spores may be nearly colorless or show different tones. Microscopy can assess dimensions, shape, ornamentation, germ pores, wall reactions, and other features required by some keys.
Reliable measurements require calibrated equipment, mature spores, suitable mounting media, enough observations, and knowledge of whether projections are included. A phone photograph through an uncalibrated microscope is not a substitute for that process.
Chemical reactions and stains should be used only with an appropriate key and safe handling. DNA sequencing likewise requires voucher integrity and trustworthy reference data; a sequence name detached from documentation can perpetuate an error.
Integrate the result into identification
After recording the color, return to the complete character set. Compare cap profile and surface, fertile-surface type, gill or pore attachment, stem, ring or volva, complete base, flesh changes, odor observed cautiously, habitat, substrate, host association, region, and season.
Use the gill-types guide for attachment and spacing, the stem-features guide for veil and base characters, and the full identification workflow to structure the comparison.
If the print conflicts with the hypothesis, keep the mushroom unidentified. Never discard an inconvenient character to preserve a desired edible name.
Safety and interpretation limits
Keep unknown specimens and print equipment away from food areas, children, and pets. Wash hands and clean the workspace after handling. Never taste an unidentified mushroom, and never treat print color as proof that a wild specimen is edible.
For suspected ingestion, contact a poison center or emergency service immediately. Preserve uncooked material, leftovers, cleaning scraps, photographs, and field notes if it is safe to do so. Do not wait for the print to finish and do not wait for social-media replies.
The correct conclusion from a clear print is a documented color group. Species identification requires the rest of the evidence, and a food decision requires qualified local, in-person confirmation.
References
Source quality notes
MushroomScope cites sources that match the page scope, such as taxonomic databases, extension guidance, food-safety agencies, food-composition databases, and peer-reviewed or institutional health references. Sources support context and uncertainty; they do not turn an online page into specimen identification, medical advice, or a tested recipe record.
Frequently asked questions
Can mushroom spore print colors and how to record them confirm that a mushroom is edible?
No. This guide organizes observations only. Never eat a wild mushroom unless a qualified local expert has examined the complete specimen in person.
Is one photograph enough for identification?
No. Photograph the cap, fertile surface, intact stem base, habitat, substrate, and several developmental stages, and record location and date.
What should I do when features conflict?
Keep the identification unresolved. Recheck local keys and current taxonomy, preserve the original observations, and seek qualified in-person help.
How long should a mushroom sit for a spore print?
Several hours or overnight is common, but maturity, freshness, humidity, and species affect release. Check periodically so condensation or decay does not obscure the deposit.
Does no visible print mean the spores are white?
No. The cap may be immature, old, dry, damaged, or simply not releasing spores. Repeat with suitable fresh material rather than recording an absent deposit as white.
Related guides
identification
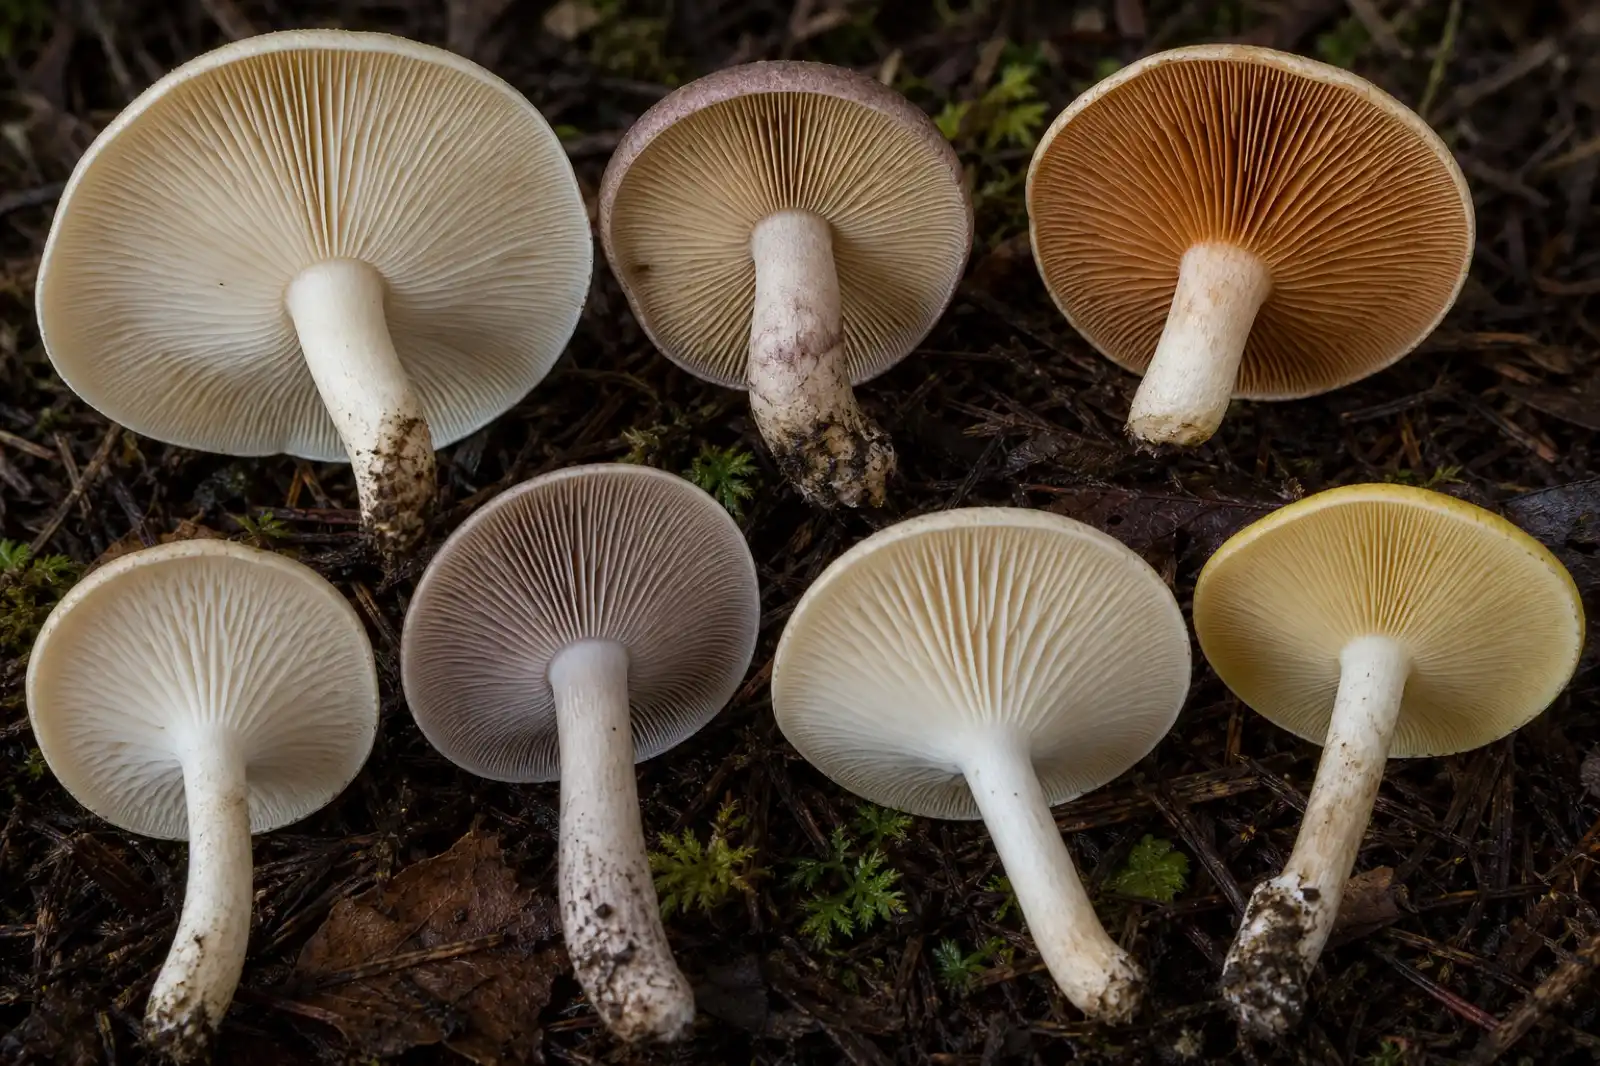
Mushroom Gill Types: Attachment, Spacing, and Color
Compare free, attached, notched, adnate, and decurrent mushroom gills while recording spacing, short gills, edge details, bruising, and color changes.
identification
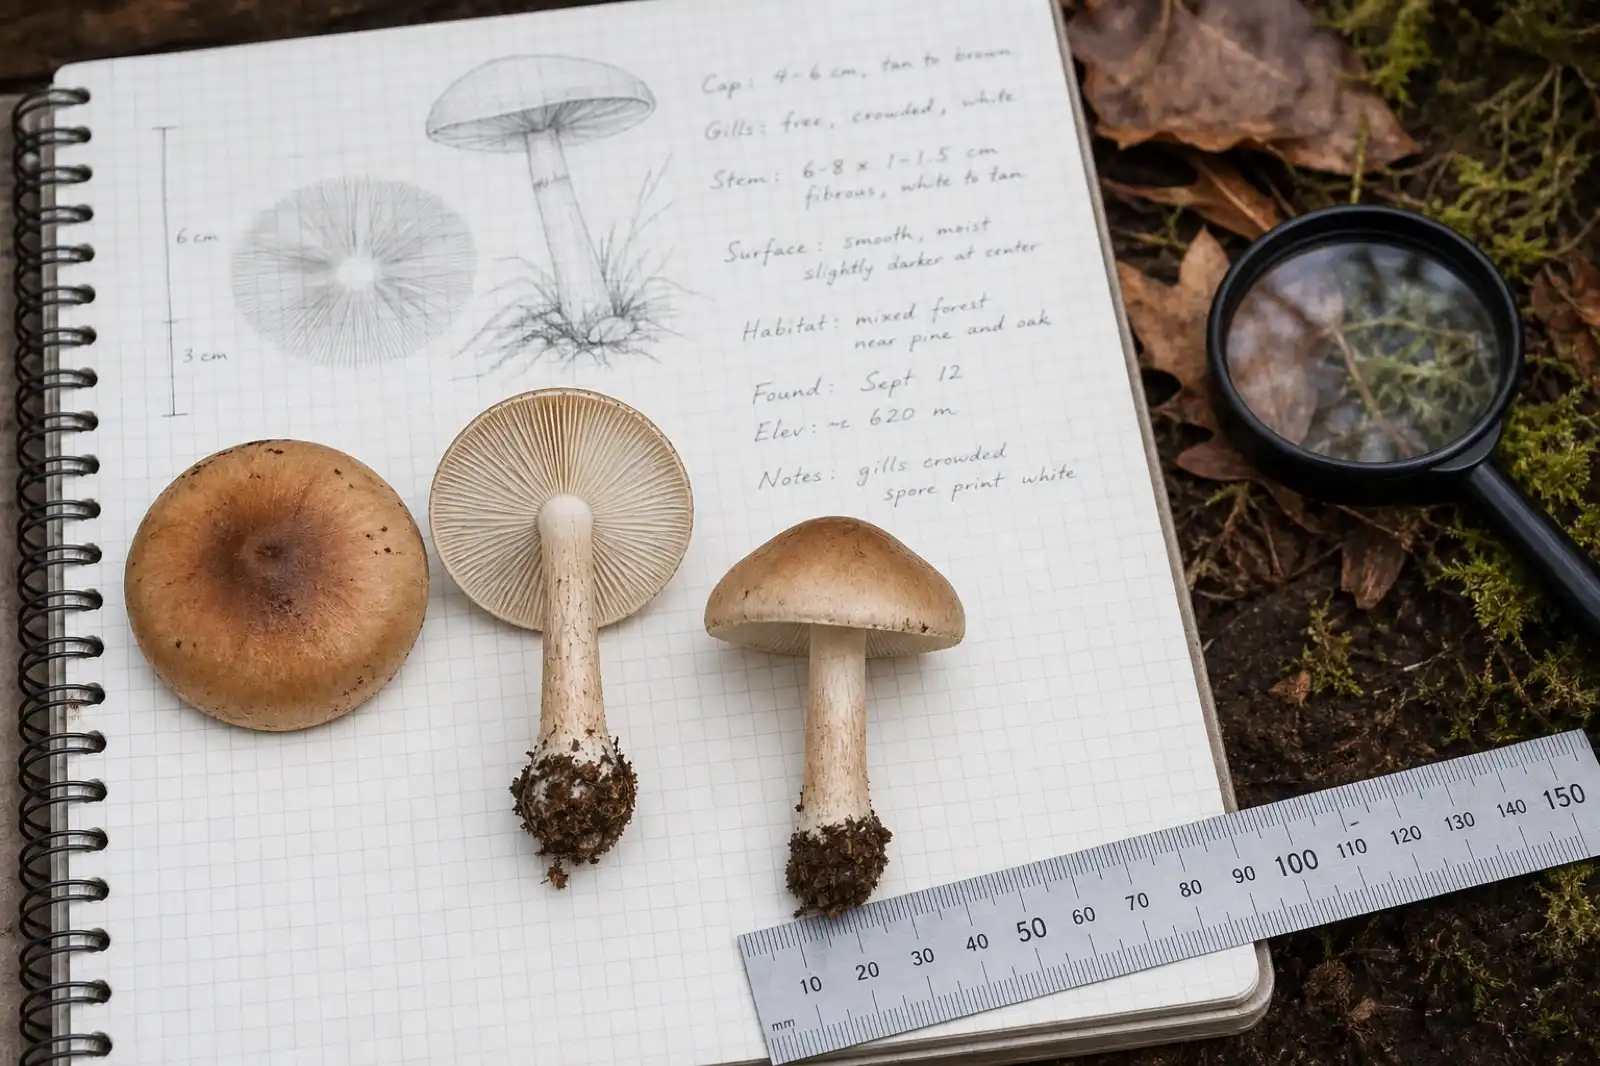
How to Identify Mushrooms: A Beginner's Field Guide
Build an identification from the whole specimen, substrate, habitat, spore deposit, and location—not from a single photograph.
identification
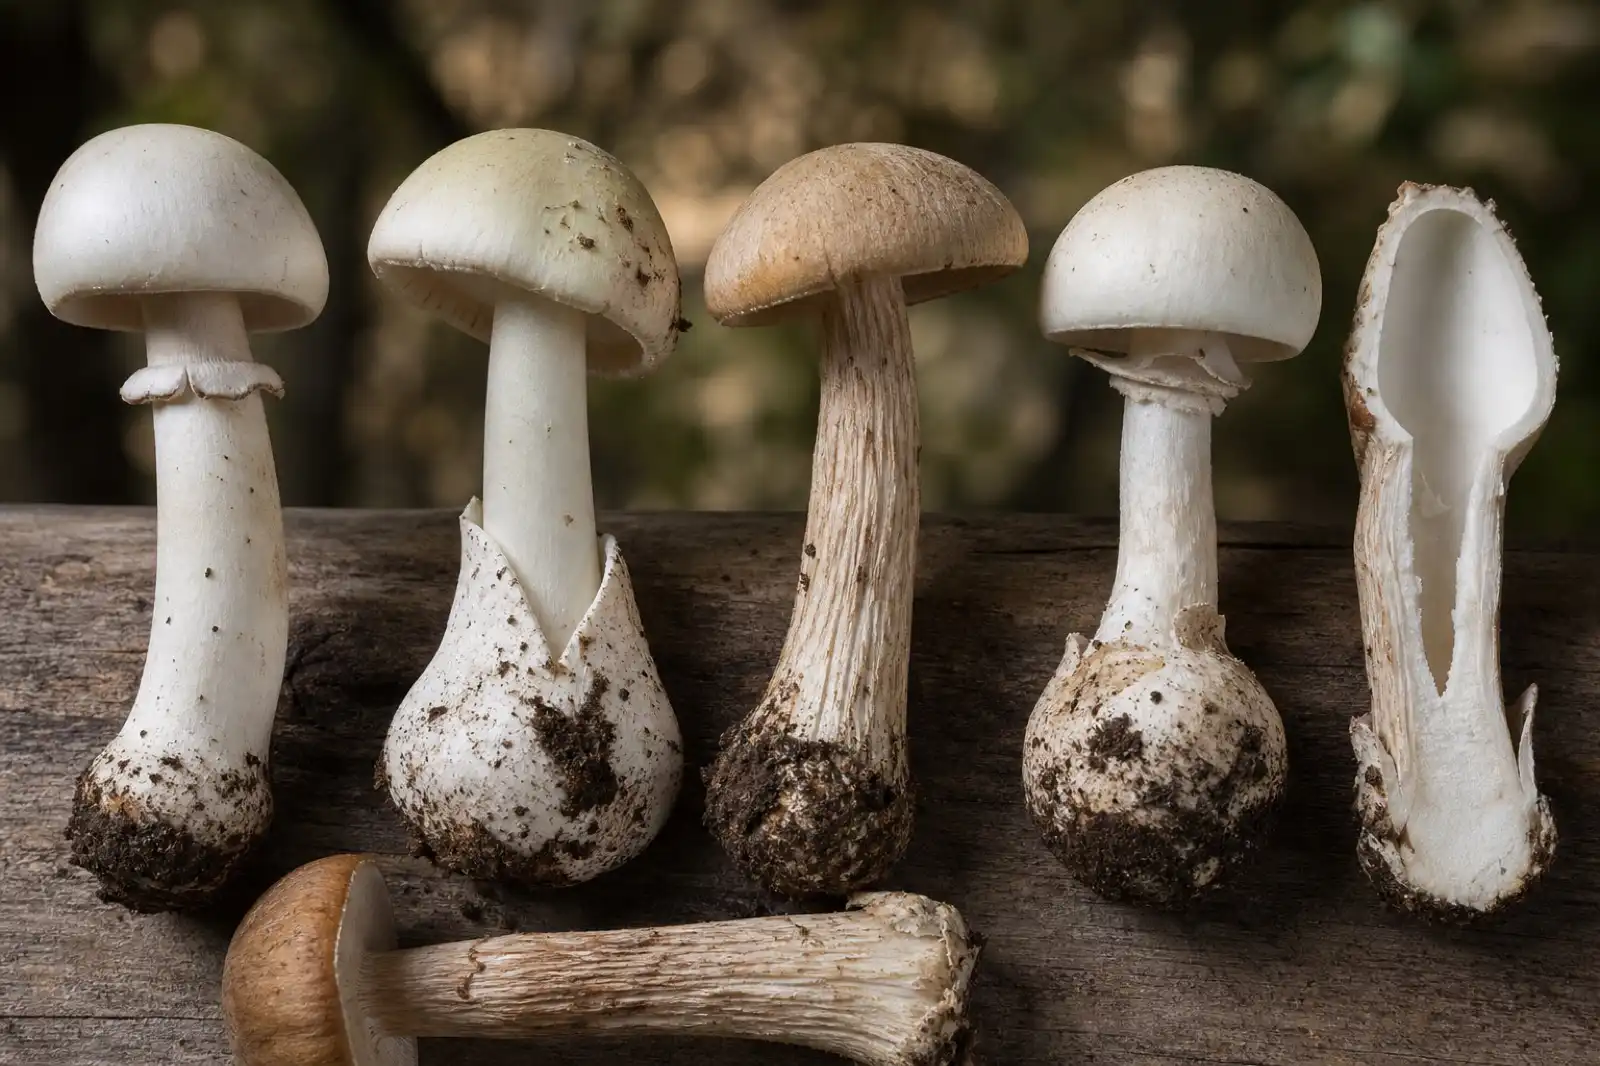
Mushroom Stem Features: Rings, Volvas, Texture, and Base
Document mushroom stem shape, attachment, rings, volvas, buried bases, internal structure, bruising, and texture without using one feature to decide edibility.
Continue exploring
Browse more practical guides in Identification or visit the mushroom encyclopedia.